Pages

Thursday, March 28, 2013

Monster Cake Pops

I finally got to it...making the cake pops I mean. It was easier than I thought. Here are the key steps I followed  for easy, yummy and good looking cake pops.


- I used a Cake mix...Better Crocker Vanilla Super Moist cake. This kind has some pudding mixed in the box already.
- I added another 1/2 of the small box pudding in it for some good measure (and it paid off). I just used the Vanilla pudding to along with the cake mix flavor. Add the dry pudding powder into the cake mix before adding the wet ingredients. This makes for an amazing moist and delicious cake
- Substitute more than half the recommended oil for the mix with unsweetened Apple Sauce. Healthy, delicious and great for pops.

- Bake the cake and let cool completely. And when I say completely, I really mean it.
- Crumble to almost sand like consistency. I used my dear old fingers. Allowed me to nibble on some larger pieces. But food processor could do this job as well.
- Add no more than a tablespoon of the binder. Binder equals anything from frosting, cream cheese to nutella. Note that I said no more than a tablespoon.
- Let the mix sit for, say 10 minutes just so everyone gets to mingle.
- Start forming balls. I started with my tablespoon scoop and soon got tired of it. I just eyeballed. But make sure that the balls are less than 1" in diameter. The coating is much thicker than you think and heavier too.


- No need to chill. In fact I recommend not to. Just let them hang out on your counter top. That will prevent cracking of the candy coating due to temperature difference. Now, if you are talking 90 degree days, then yes, please put them in the fridge till you get the candy melts ready.
- Melt the candy melts in the microwave per package directions. I did mine in a coffee mug deep enough to dip the cake balls. Start with 30 seconds. Pull them out stir a little. At this point they haven't started melting so much. Put them in for another 30 minutes. You might think it needs more time, but it doesn't really (of course things change with the power of your microwave). Stir with slow and steady movements. Do not go crazy with this. Be patient. Slowly but surely, the candy melts will start to get gorgeous and silky. I added a tablespoon of veggie oil.


- get your pop sticks out. Dip about 3/4" into the candy melts now melted. And shove them up the cake ball. Try not to go more than half way up. Do all of them so by the time the last one is done, the first one is ready to be dunked.
- Dunk the ball straight, head down and immediately lift it so that the ball is facing up. Rotate the stick and lightly tap the stick on the mug. Again...do not go crazy. The pop will literally pop out of the stick.
- Make sure all excess chocolate is gone
- Add decorations before that chocolate dries up and boy! does it dry up fast. (The candy eyes are available at Michaels, Target, PartyCity)
- Stick them vertically in a Styrofoam. I wrapped mine in my monster wrapping paper.
- And Done.


I did mine the day before and never refrigerated them. They are delicious. Didn't fall out, or crack or ooze any oil. I got myself delicious smooth balding little monsters. I added a few hair here and there for variety.
Everyone loved them...especially the kids!!!


Wednesday, March 27, 2013

Happy Holi!

Holi - in simple words: Festival of Colors. Lots of colors. Of course there is more to it than colors...a bit more information can be found here. This year we celebrated full desi style in Los Angeles. It was a fantastic experience for my 2 year old. She loved it and colored herself crazy. We all had a blast! Some pictures of our celebration...courtesy my talented husband!!


Monday, March 25, 2013

Comeback with a Monster


Let me start with a much needed apology...sorry for being MIA for so long! As much as I enjoyed the past year with my little new born (now 2), I had to dig really deep to find time even to cook, let alone blog about it. But what I did this past weekend (well, 2 weekends ago now) is beyond all of these lame excuses. I feel so proud that I had to share it with everyone. I attempted to make cakes...yes, I said cakeS with an S. It was my daughter's 2nd Birthday and thought, why spend $70 on a cake (that's what cakes of good quality go for these days apparently) when I can make one for third of the cost. Of course, I did not include the day off I had to take from work just to finish it. But it was still well worth it.

Let me just say, these were not just any cakes...one of them was an adorable 3 tier hairy Monster Cake and then, to make my vacation day well worth it, I also made Monster Cake Pops. The pops actually came from the 4th cake I didn't need for the Monster cake and couldn't finish eating. So I got only about 25 pops...but cute ones. If you haven't guessed already, it was a monster theme party...not because my daughter like Cute Monsters, but because I love them!!!

Ok, I know I am a designer and all, but when I saw this cake I realized there was no time or need to get 'inspired', criticize the hell out of it and then 'redesign' essentially the same thing. It was amazing as it was. Plus I had not baked cakes for, well, may be 12 years. I rather invest my creativity in making the cake pops look as cute as the cake.


I will post the journey of my cake pops in the following posts. This post is dedicated to my Monstaah Cake.
As you know I have no fancy schmancy mixer in my tiny little kitchen, so hand mixer had to do. (I can almost hear a few gasps! here) So please don't judge me when I say I used a box mix. Vanilla Super Moist kind by Betty Crocker . Feel more than free to bake your own from-scratch cake of any flavor you like. But $1.19 per box was a good enough reason for me. To cover up my guilt, I made my own Vanilla Buttercream and did some minor 'redesign' to the box mix.


So there is no recipe here really...just process!!

Here is what I did...
- I added 1/2 of small vanilla pudding mix into my cake mix before adding the wet ingredients
- I replaced 75% of the required oil with unsweetened Apple Sauce.
- Do not over bake the cake.
- Wrap the baked and cooled cakes in plastic wrap and keep in the fridge overnight (not necessary, but I did it)
- Level the cakes carefully
- Sprayed each tier with sugar syrup during assembly (boil 1 cup sugar and 2 cups water. You can add any additional flavoring to this as well, like lemon rinds or almond flavoring etc)
- Crumb coat before icing.


For the delicious buttercream I used recipe similar to this and added Wilton's orange gel coloring. My buttercream came out a little on the softer side, but it kind of worked out in my favor. The hair would droop down which kind of looked, well, hairy. Here is a wonderful tutorial on how to do a  monster cake and another one showing you how to pipe hair.


Some fun monster activities for the kids (and grown-ups)! and here is the table below with home-made cake, cake pops and sandwiches!!! (more on the pops coming soon)


Tuesday, August 23, 2011

cantaloup milkshake with mint and cardamom


 We all know and enjoy Lassi, Mango lassi to be precise. In India, plain old sweet lassi is very popular. But United States seems to have welcomed the fruity version of it. I love it too. But when you run out of mangoes, and are too lazy for the grocery run, anything in your refrigerator will have to do. I was hoping for the Papaya I had purchased just 2 days ago. But that was gone too!!! FYI, Papaya Lassi is absolutely delicious, just in case you run out of mangoes and are dying to drink some form of Lassi. 

I saw something orange in the back of my fridge...aha, cantaloup!!! I always wondered what a melony lassi would taste like. I was about to find out. But it was like I was not meant to have Lassi that day, I was out of yogurt and that never ever happens in my house. Sigh!!! I was hell bound on making me a refreshing drink nonetheless. Cantaloup shake it was and not just any kind...with mint and cardamom! Delish!!!!

cantaloup milkshake with mint and cardamom

1 1/2 cup fresh cantaloup, roughly chopped
1 cup whole milk
1 tablespoon honey 
1/8 teaspoon ground cardamom
few sprigs of mint
Add all ingredients into a blender and pulse until combined. Pour into glasses and refrigerate till chilled before serving.

Replace 1 cup of whole milk by 1/2 cup yogurt + 1/2 cup milk and you got yourself some minty cantaloup Lassi.

Monday, August 22, 2011

spicy potatoes in microwave

 
It was years after owning a kerosene stove that we finally bought a little two burner gas stove that sat on the counter top. Before that I think the kerosene stove had taken over my grandma's life. There was a distinct groan in her voice when she woke up every morning. But it got a lot easier with the gas stove. She got 15 minutes of extra sleep. Kerosene was replaced by the bulky red gas cylinders. Everything was cooked on it in the morning and heated on it for dinners. It was not until 2003 that I purchased a little microwave for her. She barely used it at first, afraid that it might explode somehow. She did eventually learn how to warm up her rice in it and it was a life changing moment when she showed me this super easy potato dish she prepared in it. My jaw dropped two storeys down when she proudly presented me with the potatoes. Now if grandma could do it in the microwave, anyone can.

Here is the quick, easy and delicious recipe from my adventurous grandma...

spicy potatoes in microwave

2 large potatoes, washed, peeled and chopped into small cubes (you can leave the skins on if you like)
1 teaspoon chili powder
1/4 teaspoon turmeric powder
1 teaspoon ginger-garlic paste
2 tablespoons oil
salt to taste
cilantro for garnish

In a large microwave safe bowl add oil, chili powder, turmeric, ginger-garlic paste and salt and mix well. Add the chopped potatoes and thoroughly mix making sure that the potatoes are well coated with the spices.

Microwave on high for about 8-10 minutes stirring every 3-4 minutes, till the potatoes are fork tender. No need to cover the bowl while cooking. Garnish with cilantro and it's ready to eat.

You can even add cumin powder to it or squeeze some lime before you serve. Either way it will be delicious.


Friday, August 19, 2011

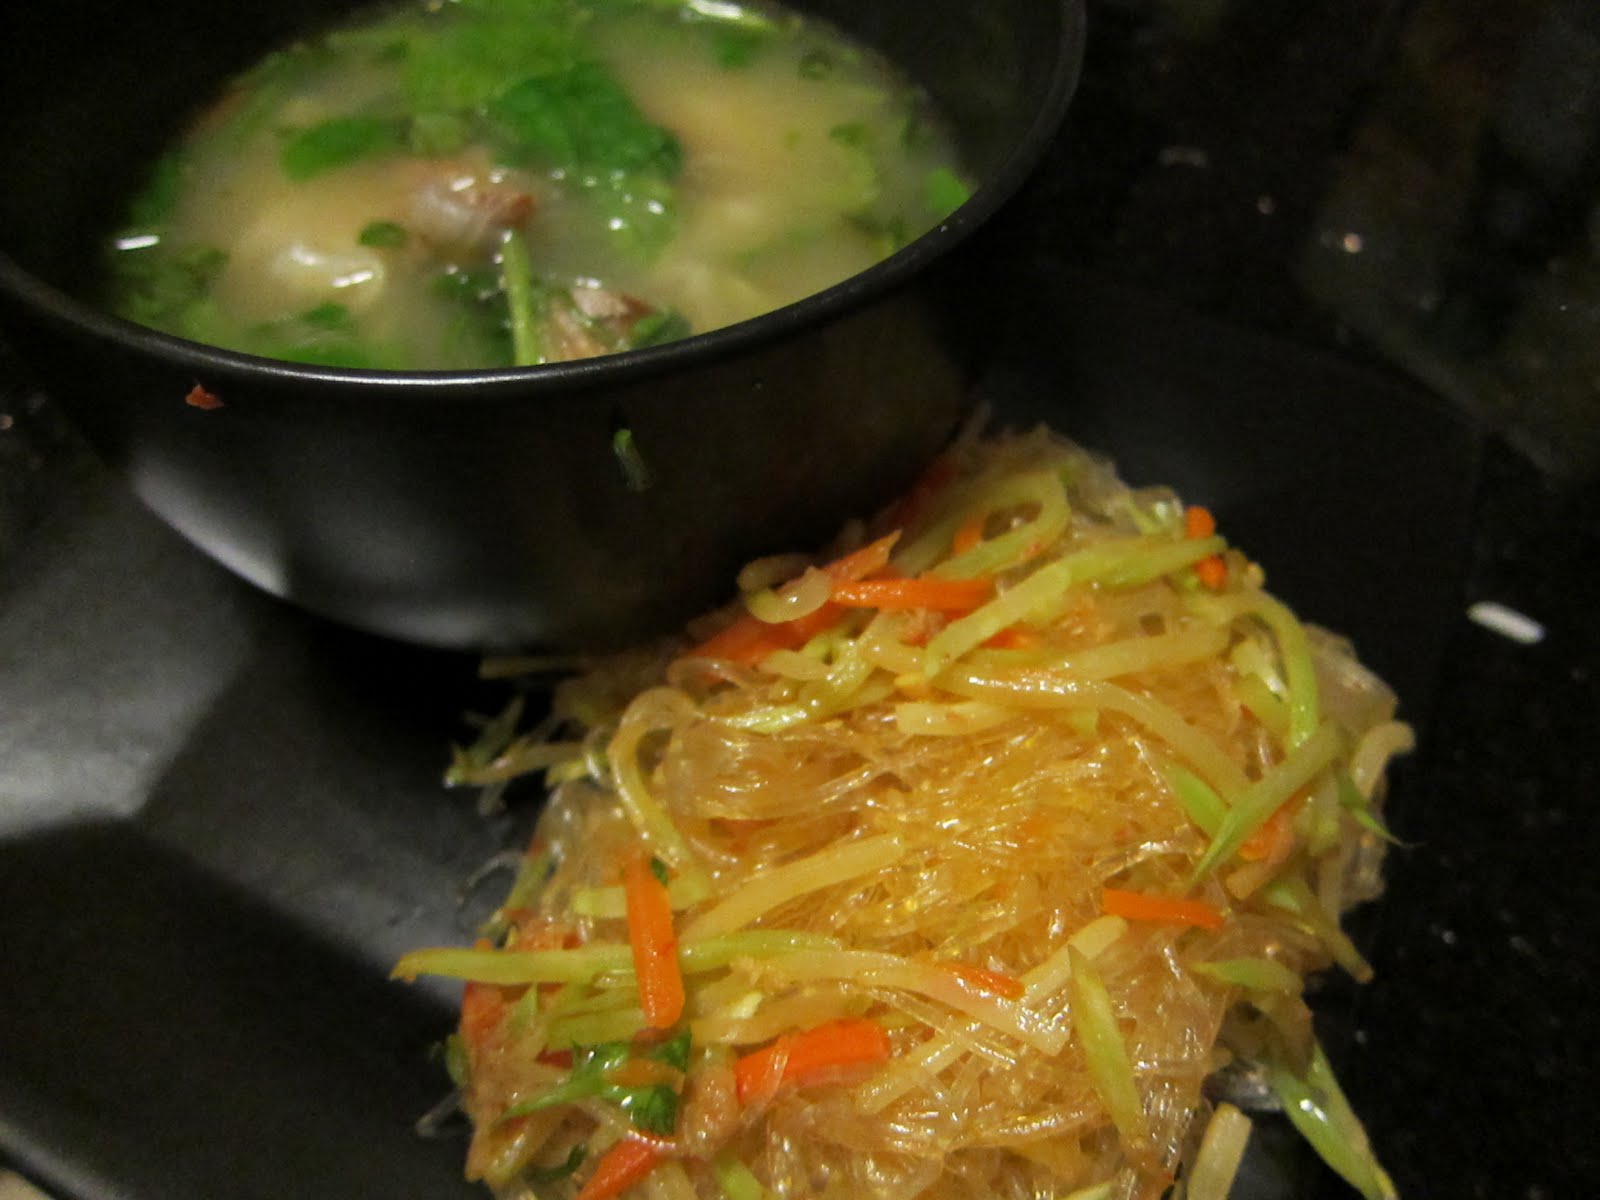
vegetable glass noodles + chicken wonton soup


My first week in the United States, almost 11 years back introduced me to cuisines other than Indian, Chinese and Pizza. That's right, Pizza, not Italian, was a cuisine in India back then. Chinese too was completely Indianized to the point that when I first tasted authentic Chinese fried rice, I needed water to gulp it down. Of course things are much different now, both in India and my liking for authentic cuisines.

I love Indian Chinese. I am talking about food of course and my only source for that food was the corner restaurant called Nam Lim Singh's Chinese Dhaba. Now that I think of it, I certainly hope it was chicken that was served.(yikes!) All said and done, food was delicious. My grandma's thoughts were. "If the food it so hot, it must kill all the bacteria. I am sure it is safe to eat.' So we blissfully enjoyed the yummy food that most Asians have never heard of. My favorites were Chicken Manchurian and American Chopsuey with crunchy chowmein noodles sprinkled on top. Chicken Lollipops were an additional treat for special days. I will be attempting make these sometime, but for now here is the recipe of my other favorite Asian cuisine:


Vegetable Glass Noodles & Chicken Wonton Soup
You probably think I have lost my mind to make soup this time of year especially since I have been complaining about the heat so much. But my husband is down with cough and cold and this was my way of comforting him and preventing that nasty cough from getting to me.

For Noodles:
1 packet thin glass noodles
3 cloves of garlic, minced fine
1 teaspoon minced fresh ginger
2 tablespoons soy sauce (I used the low sodium kind)
1 teaspoon chili garlic sauce
1 cup broccoli slaw (you can use any veggies of your choice)
2 stalks of scallions, chopped finely
salt to taste

In a large microwave safe container warm some water for 4-5 minutes. Put the glass noodles and let stand for 10-15 minutes till the noodles are soft.

In a wok or similar pan heat some oil and add ginger, garlic and chili garlic sauce. Toss for a few minutes and add the broccoli slaw and saute for a couple of minutes. Keep the heat on high. Make sure the veggies stay crispy. Add to this soy sauce and salt and stir well. 

Drain the noodles and immediately add to the wok and stir well. Garnish with scallions and serve hot. You can also add some toasted sesame seeds for garnish or squeeze some fresh lime juice over it. I also added a few peanuts on my noodles.


For the Wontons:
 
1 packet thin wonton wrappers
2 cups minced chicken
1 cup finely chopped green onion
3 cloves garlic, finely minced
2 teaspoon minced fresh ginger
1 tablespoon soy sauce
salt per taste

Mix all ingredients except the wrapper in a bowl till everything is well incorporated. Take the wonton wrappers and place the mixture in the center of each wrapper. Apply little water to the edges as a glue. You can fold them any shape you like. I went for a simple triangle. Make sure there is no air inside and that they are well sealed.

For the Soup:

6 cups low sodium chicken stock
3-4 cloves of garlic
1 tablespoon minced fresh ginger
1 cup baby spinach, washed
juice of 1 lime
2 tablespoons soy sauce
1 teaspoon sesame oil
salt to taste
In a large saucepan heat about 1 tablespoon of oil and toss in the ginger and garlic. Add the broth, soy sauce,  lime juice and salt and simmer for about 5-7 minutes. Add the wontons and spinach and cook for about 5 minutes.Drizzle the sesame oil and serve hot!!!


Wednesday, August 17, 2011

spicy tapioca (sabudana khichdi)


Tapioca (Sabudana) was one of my favorite things in the whole world. I said 'was' only because even if I have made the dish a hundred times, it is never quite as yummy as my grandma's. She made the best khichdi I have ever tasted. She would have it ready for me, nice and steamy  when I got back from school the day I had extra tough classes. It was one food I ate when I wasn't even hungry and the only food when I was sick (other than chocolate).

It still is my go to comfort dish. Unfortunately, it requires the tapioca to be washed and soaked overnight, so it needs a little do ahead prep time. Which means I need to know today that I want to eat it tomorrow. Doesn't always work out, but when it does it is the best feeling in the world.One bite and it takes me to my childhood. It still doesn't taste like how my grandma made it, but it is pretty darn close (I think she sneaked in twice as much oil to fatten me up - her one goal in life)


Spicy Tapioca (Sabudana Khichdi)
Khichdi actually means combination of ingredients. In this case tapioca with peanuts and cumin. It is an acquired taste, but worth a try at least once. Now the key to making this dish is the soaking of the tapioca. One wrong move and it can turn into a nasty old lumpy goo. It needs at least 8 hours of soaking. So plan accordingly.

1 cup tapioca (sabudana or sago pearls)
1/2  cup dry roasted peanuts, chopped coarsely
2 green chilies sliced
2 tablespoon oil
1/2  teaspoon cumin seeds
4-5 kari leaves (you can omit these if you don't have them handy)
1 small potato, boiled and chopped into small cubes (you can also microwave it till the potato is soft)
1 tablespoon sugar
salt to taste
2 tablespoons finely chopped cilantro for garnish

Wash the tapioca very gently for not more than 15-20 seconds. (do not scrub, be very gentle) Drain that water and add just enough water to barely soak the tapioca (water and tapioca level should be equal). Allow to soak for 8 hours.

In about 8 hours run your fingers through the tapioca to loosen them up. At this point they should look translucent and swollen. Fold in sugar, salt, and peanuts into it.

In a medium saucepan heat oil and add cumin. Allow to brown slightly and add chillies and kari leaves. Toss for a few seconds. Stir in the potatoes for a few minutes. Add the tapioca-peanut mixture and stir well. Keep stirring for 8-10 minutes. The color of tapioca will slowly change to light brown. Turn of the heat and let stand for a couple of minutes.

Garnish with Cilantro and serve hot!!! You can either serve just plain or you can add either a teaspoon or so of lemon juice or 2-3 tablespoons of yogurt. Any way you have it, it is delicious.

Tuesday, August 9, 2011

saffron and pistachio ice cream (without machine)


Summer is absolutely here, the heat is going crazy. Temperatures were flirting around 3 figures before cooling off slightly. And with the heat in the suicidal range, nothing else comes to mind except icecream. And not just any kind...my favorite since childhood, saffron and pistachio ice cream.  As a kid I could eat any ice cream as a meal (I still can, I think), but this was my favorite, with butterscotch a close second. My grandma always stacked these in the freezer as a bribe and it worked quite well. "If you finish you homework by 6pm, I will give you some ice cream'. It was done before 5. The motivation was immense. 

With lack of my favorite flavors in the supermarkets, I had to take things in my own hands. And boy did I ever...with this fantastic 3 ingredient (few more for flavors), no ice cream maker needed deliciously creamy Ice cream. Ya heard!


I came across this recipe on Kevin & Amanda's lovely site. I have been looking for easy to make ice-cream without the maker for so long. This is so delicious, you wouldn't believe it was done within 5 minutes. It was even more delicious than I remembered...rich, creamy, just divine. Next time I might get a bit more adventurous and add some fruit, like papaya with pine nuts. Yum!!

Saffron and Pistachio Ice-Cream
Adapted from Kevin & Amanda

2 cups Heavy Cream
1 can Sweetened Condensed Milk
1/2 teaspoon Vanilla Extract
1/2 teaspoon Saffron strands
handful of pistachio, shelled and broken into tiny pieces
small pinch of cardamom powder (optional)

Reserve 2 tablespoons of heavy cream in a small bowl and add the saffron strands. Let this stand for 10-15 minutes till the cream turns the color of saffron.

In a large bowl whip the heavy cream till stiff peaks. Add condensed milk, vanilla extract,  cardamom powder, saffron cream and pistachios. Stir well till everything is mixed thoroughly

Pour in a covered container and freeze for 5-6 hours or till firm. Store the left overs if any, in the freezer.
How easy is that!!!

Monday, August 8, 2011

pea and crab salad


Mark Bittman is my hero (well, sort of). He boasts of cooking in a tiny kitchen, just like I do. Except, he own a condo in New York with a great view, a big freaking terrace with a large freaking grill. Nevertheless, he is a wonderful chef and writer, and I love his column in the New York Times. That's where I came across this scrumptious looking pea and crab salad. Now I am not much of a pea fan, especially in salads. But I am a big enough crab fan to give this salad a try. That being said, the salad was divine, peas and all. 

If I haven't said this enough on my blog, I love summers, but hate the heat. And that in turn  means I keep the cooking on absolutely necessary basis. So here is another salad recipe from me. I promise they will slowly disappear as fall and winter approach. But for now, here is a delicious salad that you will love. I served it with some simple baked fingerling potatoes and got myself a satisfying meal.


Pea and crab salad
Adapted from Mark Bittman
I have used frozen peas instead of fresh ones. Shelling peas is not labor of love for me, it's just labor. And it helps me skip the process of poaching them. But you can use fresh peas as recommended in the original recipe.

11/2 cups frozen peas, thawed (about 1 bag)
1 small red onion, sliced thinly
1/2 red bell pepper, chopped finely
1 cup fresh cooked crabmeat (you can use shrimp instead as well)
2 tablespoons extra virgin olive oil
Handful of pine nuts
Freshly squeezed lemon juice from 1 lemon
Shredded basil for garnish
Salt and ground black pepper per taste

In a large bowl, combine the first six ingredients and add some salt and pepper. Garnish with Basil and serve!!!

Baked fingerling potatoes

1 bag of fingerling potatoes (about 20 potatoes)
2 tablespoons extra virgin olive oil
1/2 teaspoon cayenne pepper
few leaves of rosemary
salt and pepper to taste

Preheat oven (I used my toaster oven) at 400 degrees. Mix everything and lay on a baking sheet. Bake for 45 minutes or till the potatoes are fork tender and serve.

Wednesday, August 3, 2011

mango chutney in minutes


Month of May was one of my favorite times of the year. Other than the nasty heat, everything about it was great. It was the month when our summer vacation started, it was also the month before the monsoon started (my other favorite time of the year) and it was when the ever so beautiful Mayflower (Gulmohar) tree blossomed. But the most important reason was that it brought the mighty Alphonso mango in season. They don't call the Alphonso the king of fruits for no reason. You really have to taste it to believe. 

As soon as vacations started I would perch on my bed staring out the window that framed a gorgeous Mayflower tree fully bloomed with the blazing red flowers, a book in one hand and fork in the other. The fork was usually to pick the beautiful orange colored mango pieces in my bowl. A whole month of things I loved, what could be better? As soon as June arrived, the rains would erase the flowers from that tree slowly till it was almost naked. It was the start of monsoon!! Sadly the end of both Mayflower as well as the Mango. But it also meant corn was in season and the school was about to start in a week. What wonderful memories!!!


Here in L.A., I miss everything, the flowers, the mango and the rains. But just this last weekend I found some lovely looking Mexican Mangoes on sale. They taste nothing like the Alphonso, but they'll do just fine for now. In the process of letting it sit to ripen, I ended up waiting too long. Last night I found the once lovely mango start to shrivel. I had to do something. It's not fun eating an over ripe mango...so chutney came to mind. I have always wanted to try some mango chutney for a while, but never got to it. Now was my chance. It is by far the simplest recipe I have ever made. All you need is a mango, some sugar, and a microwave. You can then get fancy and add whatever spices you like. Yummy beyond words!!!

Mango Chutney in minutes
Adapted from Saffron Trail
Make sure you don't over-microwave it. The mango should not burn or turn to mush. So adjust the heating time accordingly. I believe this kind of chutney might be possible with many other fruits too, like pineapple, may be even tomatoes. If you try, do let me know how it turns out.

1 ripe mango, cut into bite size pieces
1 tablespoon of brown sugar (or jaggery if you have some) (adjust the sugar to your taste)
pinch of cayenne pepper
pinch of cardamom power (optional)
small pinch of salt and freshly ground black pepper
Mix everything and microwave on on high for about 6-7 minutes. Make sure to stir it 2-3 times in between.
Done!!!

Thursday, July 28, 2011

egg curry


Since I made the spicy egg salad sandwich a few days back, my husband has been secretly craving for the egg curry he loves. After hoping against hope he finally gave up on me and made some himself last night. Boy was it delicious!! And the best part...I got to be a couch potato for the night. With our daughter fast asleep, and my husband busy in the kitchen, I parked myself on our lumpy couch and nibbled on plantain chips while watching something brainless on the tv. The joy of doing nothing is just so wonderful.


Giving credit where it's due...

Egg Curry
Recipe by my husband adapted from vahrevah

5 eggs, boiled, shelled and halved
1 large onion, finely chopped
1 teaspoon black mustard seeds
1 teaspoon cumin
1 teaspoon red chili powder 
1 tablespoon coriander powder
1 teaspoon cumin powder
1 teaspoon dried fenugreek leaves 
4-5 kari leaves
1 tablespoon ginger garlic paste
pinch of turmeric powder
tamarind juice (soak a teaspoon of tamarind pulp in about 100ml warm water for 10-15 minutes) (you could substitute this for lemon juice, only and only if you looked hard and didn't find tamarind)
1 green chili, chopped
1 teaspoon sugar
salt per taste


Heat oil in a large saucepan and add mustard seeds. Let them splutter. Add cumin, chilies, fenugreek leaves and kari leaves to the oil. Stir for about a minute and add chopped onions and stir till they start browning.
Now add ginger garlic paste, turmeric powder, chili powder, coriander powder and cumin powder and mix well. Saute the mix for about 5-6 minutes.

Add the tamarind extract and 2 cups of water and bring to a boil. Add salt and sugar and simmer for about 10 minutes. Add the boiled eggs and let it cook in the gravy till the curry thickens slightly, about 3-4 minutes.

Garnish with chopped coriander leaves. Serve hot over steamed rice.

Wednesday, July 27, 2011

wordless wednesday


need I say more? delicious chocolate and toffee cupcake from Frosted for breakfast. Yum!!!

Tuesday, July 26, 2011

spiced egg salad sandwich with avocado


I can't say I am big egg fan. I really have to crave for them to make something out of them. My husband on the other hand loves them. So when he saw me crave for some eggs yesterday, he looked excited. I usually make his favorite egg curry or simply a yummy omelet. But I was feeling adventurous this time. It kind of upset him, but if I was eating eggs, they had to be absolutely delicious. 

I wouldn't eat an egg salad sandwich if you paid me to do it. (Well, if it involves 6 digit figures then it's a different story). But I wasn't feeling like making a curry in this scorching heat and omelet was just too simple. So I decided to Indianize the infamous egg salad sandwich. And I can't complain about the outcome. Simple ingredients, easy and quick...a bonus point was it was healthy too. Eliminating the mayo was probably why I liked it so much. 


spiced egg salad sandwich with avocado

4 hard boiled eggs, chopped fine (you can even choose to do egg white only salad)
1 avocado, chopped fine
1 teaspoon cumin powder
1/2 teaspoon cayenne powder
1 teaspoon dijon mustard
1 cloves of garlic, finely minced
juice of 1/2 lemon
salt and pepper per taste
handful of baby spinach leaves, washed and dried
1/2 cup of grated parmesan cheese
6 slices of a hearty bread (I used the 12 grain bread)
butter (optional)

In a large bowl add the first 7 ingredients and mix really well. The avocado will work as the mayo in this sandwich.

Toast your bread lightly and apply some butter. Put on a generous heap of the mix. Top with cheese, spinach and the second slice of bread. You can also grill the sandwich for the melted cheese effect.

Friday, July 22, 2011

garbanzo bean and zucchini salad


There are days when I feel blessed to live in Los Angeles. While rest of the country is burning up in 3 digit heat, we are enjoying the summer at 80 degrees here. But like most people in Los Angeles, including yours truly, have a way of complaining about everything...even the 80 degree weather. As I was extending my grumbling to my co-workers hoping for some empathy, almost all of them had the same reaction. "Aren't you from India? You should be used to this". Kind of pissed me off a little bit. Sadly it's true. From where I come from, you have just 2 seasons, hot and hotter with a few months of rain thrown in for good measure.

Coming back to the Los Angeles weather ...preparing a hot curry was beyond my scope of energy. I wanted something fresh, light, hearty and that which involved keeping my cooktop and oven turned off. Just last week I saw Giada prepare this beautiful summer salad. It looked delicious and I always love me some Giada in my kitchen. To my happy surprise I had all the ingredients that were needed, except for the lettuce, so I used Spinach instead. It is gorgeous light salad perfect for a scorching summer day.


garbanzo bean and zucchini salad
The recipe called for 1/4 cup of extra virgin olive oil. This much quantity in my salad kind of scares me. So reduced it a little bit to 2 tablespoons and still loved the salad. You can use whatever quantity suits your fancy. But make sure it a good quality oil.

Vinaigrette:
2 tablespoons fresh lemon juice
2 tablespoons extra virgin olive oil
1/2 teaspoon salt
1/4 teaspoon freshly ground black pepper

Salad:
1 can garbanzo beans, washed and drained
2 medium zucchini, diced into small pieces
1/2 cup frozen corn, thawed
1/2 small red onion, thinly sliced
3 cups of baby spinach, wash and dried
2 tablespoons of parmesan cheese

For the Vinaigrette:
In a small bowl, whisk together the lemon juice, olive oil, salt, and pepper until combined.

For the Salad: 
In a large bowl place garbanzo beans, zucchini, corn, red onion, and spinach. Pour the vinaigrette over the salad and toss well. Top with the parmesan cheese and serve.

Wednesday, July 20, 2011

delicious quinoa


One thing I love about getting back to work after a lovely 4 month break is the lunch time. We have a small little kitchen where about 10 of us gather and chat about food, people and general stuff. But mostly about food. This is where I was introduced to the little grain called quinoa only a few months back. For a few seconds I thought cous-cous had grown a little transparent tail. On tasting, it was nothing like cous-cous. It took me a while to develop a taste for quinoa, but now that I have, I make it at least ones a week. It is easy, delicious and healthy. And like rice, you can make a whole lot in a matter of few minutes.

Like most Indians, I own a pressure cooker and making quinoa is as easy as making rice. I can see most of you are going..."What??? no food processor, but you own a pressure cooker?" In my defense, I have inherited it...from my husband. He carried it with him when he came here from India. And it is super useful and easy enough to use. If you don't have the cooker, simply follow the instructions on the side of the box. I used the white kind, but I gather there are many more types of quinoa.
  

delicious quinoa

1 cup cooked quinoa (I used 1 cup quinoa with 1 1/2 cups water)
1/2 cup zucchini and carrots (any available veggies are fine)
handful of cashew nuts
1/4 teaspoon black mustard seeds
1 tablespoon chopped fresh ginger
3-4 kari leaves (optional, but gives a great taste)
1 green chili, halved
2 teaspoons oil
1 teaspoon sugar
salt per taste
cilantro for garnish

In a deep saucepan heat oil and add the mustard seeds. Allow to splutter and then add ginger, chili , cashew nuts and kari leaves.

Chop zucchini and carrots into small bite sized pieces. Add these into the saucepan and cook till carrots soften. Fluff the cooked quinoa with a fork and add to the saucepan along with salt and sugar and stir till everything has mixed well.

Garnish with cilantro and enjoy hot!!! Squeeze some lemon for even better tasting deliciousness.


Related Posts Plugin for WordPress, Blogger...